Consuming a Service
This guide explains how a Participant consumes a GAIA-X-Med Provider Service using their Participant Identity File, which they have received after following the Participant Onboarding Guide.
In this example, the Provider Service to consume is going to be the GAIA-X-Med Demonstrator, which is hosted at https://demo.gaia-med.org.
Authentication with the Participant Identity File
To authenticate for consuming a GAIA-X-Med service, a Participant first needs their Participant Identity File, which they have received from the Credential Manager after the onboarding process is complete. As explained in GAIA-X-Med Authentication, this is a file that contains all the necessary information allowing you to authenticate for the GAIA-X-Med ecosystem.
For demonstration purposes, three predefined Participant Identity Files are provided:
participant-identity.gaia-med.org_demo_alice.pif, Passphrase
aliceparticipant-identity.gaia-med.org_demo_bob.pif, Passphrase
bobparticipant-identity.gaia-med.org_demo_carol.pif, Passphrase
carol
These identities have been pre-registered with the Demonstrator, and they all possess a contract with the Provider that enables them to use its Service.
Authentication methods
As further explained in GAIA-X-Med Authentication, we provide two methods for consuming a service, each with a slightly different authentication method:
OpenID Connect-based auth, recommended if you want to provide a web app as a Service,
Proxy-based auth, recommended if you want to provide an API as a Service.
The Demonstrator supports both consumption methods, and each will be explained now.
Consuming the service via its website frontend (authenticating with OpenID Connect)
Visit the website at https://demo.gaia-med.org/. The access is protected via the OIDC authentication module, so you will be redirected to the GAIA-X-Med OIDC Identity Provider.

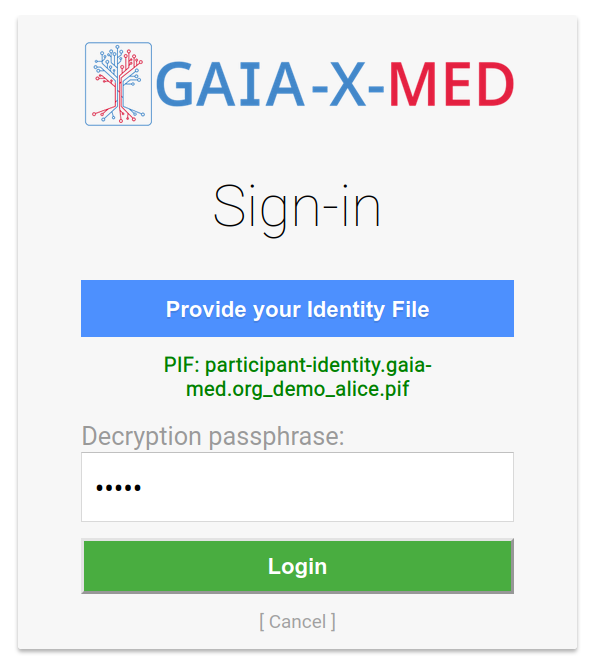
OpenID Connect Auth Step 1
Use one of the provided Participant Identity Files and the associated passphrase to login. The PIF will be decrypted and a Login Token will be generated and sent to the OIDC Identity Provider.
Note
The Participant Identity File and its passphrase will not leave your browser. They are only processed client-side.

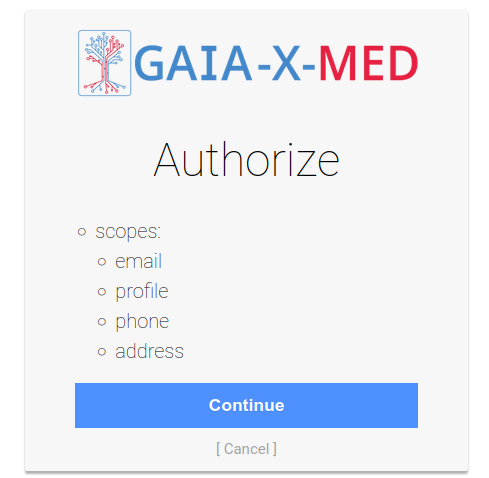
OpenID Connect Auth Step 2
After confirming that you want to share your credentials with the app, you will be redirected back to it and can then use it.
Consuming the service via its API (authenticating using the Proxy)
This method uses the endpoint at https://demo.gaia-med.org/apiProxy/, which serves only the Service’s backend API, but secured by proxying it through an instance of the Authentication Proxy.
Using a client library
You can use a client library which implements the client-side authentication flow for communicating with the Authentication Proxy.
Application-specific client library
We have written a simple Python library for consuming the demonstrator service that serves as an example of how to write application-specific libraries based on the generic client. It fully and transparently handles authentication on its own, and allows you to consume the Service similarly to other web-based APIs. You only need to supply the Participant Identity File, and the library will handle the rest.
from democlient.client import DemoRepository
from gaiaxmedclient.client import GaiaXMedClient

# PIF encryption passphrase
passphrase = 'alice'

# Base URL of the API
base_url = 'https://demo.gaia-med.org/apiProxy/'

# Load the Participant Identity File and generate a client for it.
# The client automatically handles Login Token generation and Authentication Proxy sessioning.
client = GaiaXMedClient.for_identity('participant-identity.gaia-med.org_demo_alice.pif', passphrase, base_url)

# The DemoRepository will use the client for making the following API calls
repo = DemoRepository(client)

# Get image metadata
images = repo.images

# Get a specific image
image_one = repo.images[1]

# Download & save all images
for image in repo.images.values():
    image.save(f"image-{image.id}.jpg")

# Upload a new image
repo.create_image(title="My new image", image_path="image.jpg")
Generic client library example
The generic Python client upon which the above library was built can be used itself as well, though it doesn’t offer any domain logic:
>>> from gaiaxmedclient.client import GaiaXMedClient
>>> client = GaiaXMedClient.for_identity("participant-identity.gaia-med.org-demo-alice.pif", "alice", "https://demo.gaia-med.org/apiProxy")
>>> client.get("/images").json()
[{'id': 1, 'title': 'Set of delicious jelly and caramel sweets arranged in lines by type', 'url': 'images/1'}, {'id': 2, 'title': 'Fresh blueberry placed on white table', 'url': 'images/2'}, {'id': 3, 'title': 'Bunch of ripe red delicious raspberry', 'url': 'images/3'}]
The Authentcation Proxy flow in more detail
This section describes the authentication flow in more detail to explain the process, or to help you if you wish to implement your own client.
Note
It is generally recommended to use a client library to consume a service, as it abstracts the process away (you only need to provide your Participant Identity File, and the library does the rest).
Registering a session
To make authenticated requests to the Service, you will first have to register a session with the Authentication Proxy. To that end, you need to send a HTTP GET request to the Authentication Proxy’s internal endpoint /authproxy/register with an Authorization: Bearer <xxx> header, where <xxx> is a signed JSON Web Token (or JWT) that is forwarded to the Authentication Service. It needs to contain your Participant’s DID URL in the Subject (sub) payload and is signed by your private key. (See Login token for more details on the JWT.)
Upon validation of your JWT and Credential, the Authentication Proxy will cache your credentials and you will receive a session ID in response which can then be used to make authenticated requests.
Note
The session is valid for 12 hours from registration. After it expires, you will have to re-register for a new session ID.
Making authenticated requests
After receiving a session ID, you can use it to perform authenticated API requests by adding the x-gaia-x-session header with your session ID as its value to any requests. The Authentication Proxy will use this ID to look up your cached credentials to authenticate with the Provider’s Service.
Manual JWT generation and request example
Important
This method is only presented to demonstrate the process, and to give an idea on how to build your own libraries from scratch. Only follow this example for learning purposes. Do not ask end users to manually generate their own tokens. You should use a client library instead.
Following is a description on how to manually generate the required JWT for authenticating with a GAIA-X-Med Service behind an Authentication Proxy. It requires some sort of library or tool that allows you to generate JWTs, such as jose or PyJWT. Alternatively, you can use a web service such as https://jwt.io.
Using the above demo identity of identity.gaia-med.org:demo:alice; first, a JWT is generated with the following header, defining the algorithm as RS256:
{
  "alg": "RS256",
  "typ": "JWT"
}
… and the following payload, containing Alice’s DID URL in both the Issuer and Subject fields, and setting the Issued At and Expires fields to appropriate UNIX timestamps:
{
  "iss": "did:web:identity.gaia-med.org:demo:alice",
  "sub": "did:web:identity.gaia-med.org:demo:alice",
  "iat": 1690441646,
  "exp": 1690445246
}
Using these, the JWT is compiled and signed using Alice’s private key, resulting in the finished token (wrapped for readability):
eyJhbGciOiJSUzI1NiIsInR5cCI6IkpXVCJ9.eyJpc3MiOiJkaWQ6d2ViOmlkZW50aXR5LmdhaWEtbWV
kLm9yZzpkZW1vOmFsaWNlIiwic3ViIjoiZGlkOndlYjppZGVudGl0eS5nYWlhLW1lZC5vcmc6ZGVtbzp
hbGljZSIsImlhdCI6MTY5MDQ0MTY0NiwiZXhwIjoxNjkwNDQ1MjQ2fQ.Z9MlNn5EUJ1hUeWUMSC5iKmt
HTUdM9b98d7-2rq9uO1SwvRcMTUTxzEvkLAnTb52HR-9rRzRG_cTk8mNQoujhjFy1IRjusq0l4Hu5451
fxyjVDS4zyBcVKePT7w_v8cvkvTtQ6lNKEK5H4OM_tNRbzvw7fDuWyOAFOrcnh2Oeqtygxjvk90Voxqs
llrbUT-lTztLK18nrPJ1w810e5Dlq4SV8NWLpCGh-89rm5VK7WGHu8KLxM9kaXDg2IT9vUOuNh6sbJKQ
lbDckOpnIGaMUynvldmYO5b2E8rZO92vUaqAkx1gYgpXbL4AbvIaplSGRCpfEKbJFUIgmP5BO8KguZ83
IbspDRzD24aLJtj9NzIO5PvBd6QW4Vis6t4j5smzLYexsM-RwfPY7ASssXUFqu5i1WMvaqa7Riixy4F-
B4dxPSathngJ5CD60vzGFgCtMpsCL6GQ6F8sAkZAkxCJRyX9AtKRnGMYcFzjcVyvN15LFwPXZ-OnSZsV
gjWJw6asbkgeH9Tzm08DJNIdrj7GdcaPEVTeKLQy3xNcZbTrH4Sg9zFE3P8wYOVKCoLCJ96p4ymzror\_
szsVH2ptouzYEHC8gCz2PBvnsMn5xOCdi4i3JTUapph7zXZnpP_A8YO31-_G7Ff76C1w5MMgZVsZE3cG
z14y-UilkpC3r4MM5X8
Note
The private key can be extracted from the PIF using a PIF library.
The finished JWT is included in a curl request to the Authentication
Proxy for registering a session:
curl \
  --header 'Authorization: Bearer eyJhbGciOiJSUzI1NiIsInR5cCI6IkpXVCJ9.eyJpc3MiOiJkaWQ6d2ViOmlkZW50aXR5LmdhaWEtbWVkLm9yZzpkZW1vOmFsaWNlIiwic3ViIjoiZGlkOndlYjppZGVudGl0eS5nYWlhLW1lZC5vcmc6ZGVtbzphbGljZSIsImlhdCI6MTY5MDQ0MTY0NiwiZXhwIjoxNjkwNDQ1MjQ2fQ.Z9MlNn5EUJ1hUeWUMSC5iKmtHTUdM9b98d7-2rq9uO1SwvRcMTUTxzEvkLAnTb52HR-9rRzRG_cTk8mNQoujhjFy1IRjusq0l4Hu5451fxyjVDS4zyBcVKePT7w_v8cvkvTtQ6lNKEK5H4OM_tNRbzvw7fDuWyOAFOrcnh2Oeqtygxjvk90VoxqsllrbUT-lTztLK18nrPJ1w810e5Dlq4SV8NWLpCGh-89rm5VK7WGHu8KLxM9kaXDg2IT9vUOuNh6sbJKQlbDckOpnIGaMUynvldmYO5b2E8rZO92vUaqAkx1gYgpXbL4AbvIaplSGRCpfEKbJFUIgmP5BO8KguZ83IbspDRzD24aLJtj9NzIO5PvBd6QW4Vis6t4j5smzLYexsM-RwfPY7ASssXUFqu5i1WMvaqa7Riixy4F-B4dxPSathngJ5CD60vzGFgCtMpsCL6GQ6F8sAkZAkxCJRyX9AtKRnGMYcFzjcVyvN15LFwPXZ-OnSZsVgjWJw6asbkgeH9Tzm08DJNIdrj7GdcaPEVTeKLQy3xNcZbTrH4Sg9zFE3P8wYOVKCoLCJ96p4ymzror_szsVH2ptouzYEHC8gCz2PBvnsMn5xOCdi4i3JTUapph7zXZnpP_A8YO31-_G7Ff76C1w5MMgZVsZE3cGz14y-UilkpC3r4MM5X8' \
  https://demo.gaia-med.org/apiProxy/authproxy/register
The Authentication Proxy forwards the Login Token to the GAIA-X-Med Authentication Service, which will perform the required authentication steps. On success, Alice’s credentials will be returned to the Authentication Proxy, which in turn caches those credentials internally and registers them with a session ID, which will be returned to Alice. For example:
1c37cb09-30fc-4dd7-b5d3-1137cfa64723
Alice can use this session ID in subsequent requests to the Service Backend API. For example, to fetch a list of all available images:
curl \
  --header 'x-gaia-x-session: 1c37cb09-30fc-4dd7-b5d3-1137cfa64723' \
  https://demo.gaia-med.org/apiProxy/images
The Authentication Proxy will find Alice’s cached credentials and forward them to the Service Backend, which can trust these credentials and therefore Alice’s identity.
After verifying with the Contract Service that Alice possesses a valid contract for the service, it will provide Alice with the requested images.