GAIA-X-Med Authentication
GAIA-X-Med is aligning with the Gaia-X principles of identity and trust by implementing an authentication flow that follows these principles.
This document will explain the authentication flow in greater detail, including a description of the involved parties and federation services.
Important
The contents of this document reflect the current development status of the GAIA-X-Med project, and are subject to change. We will inform you if any major breaking changes to the specification(s) occur in the future.
Authentication in GAIA-X-Med
High-level overview
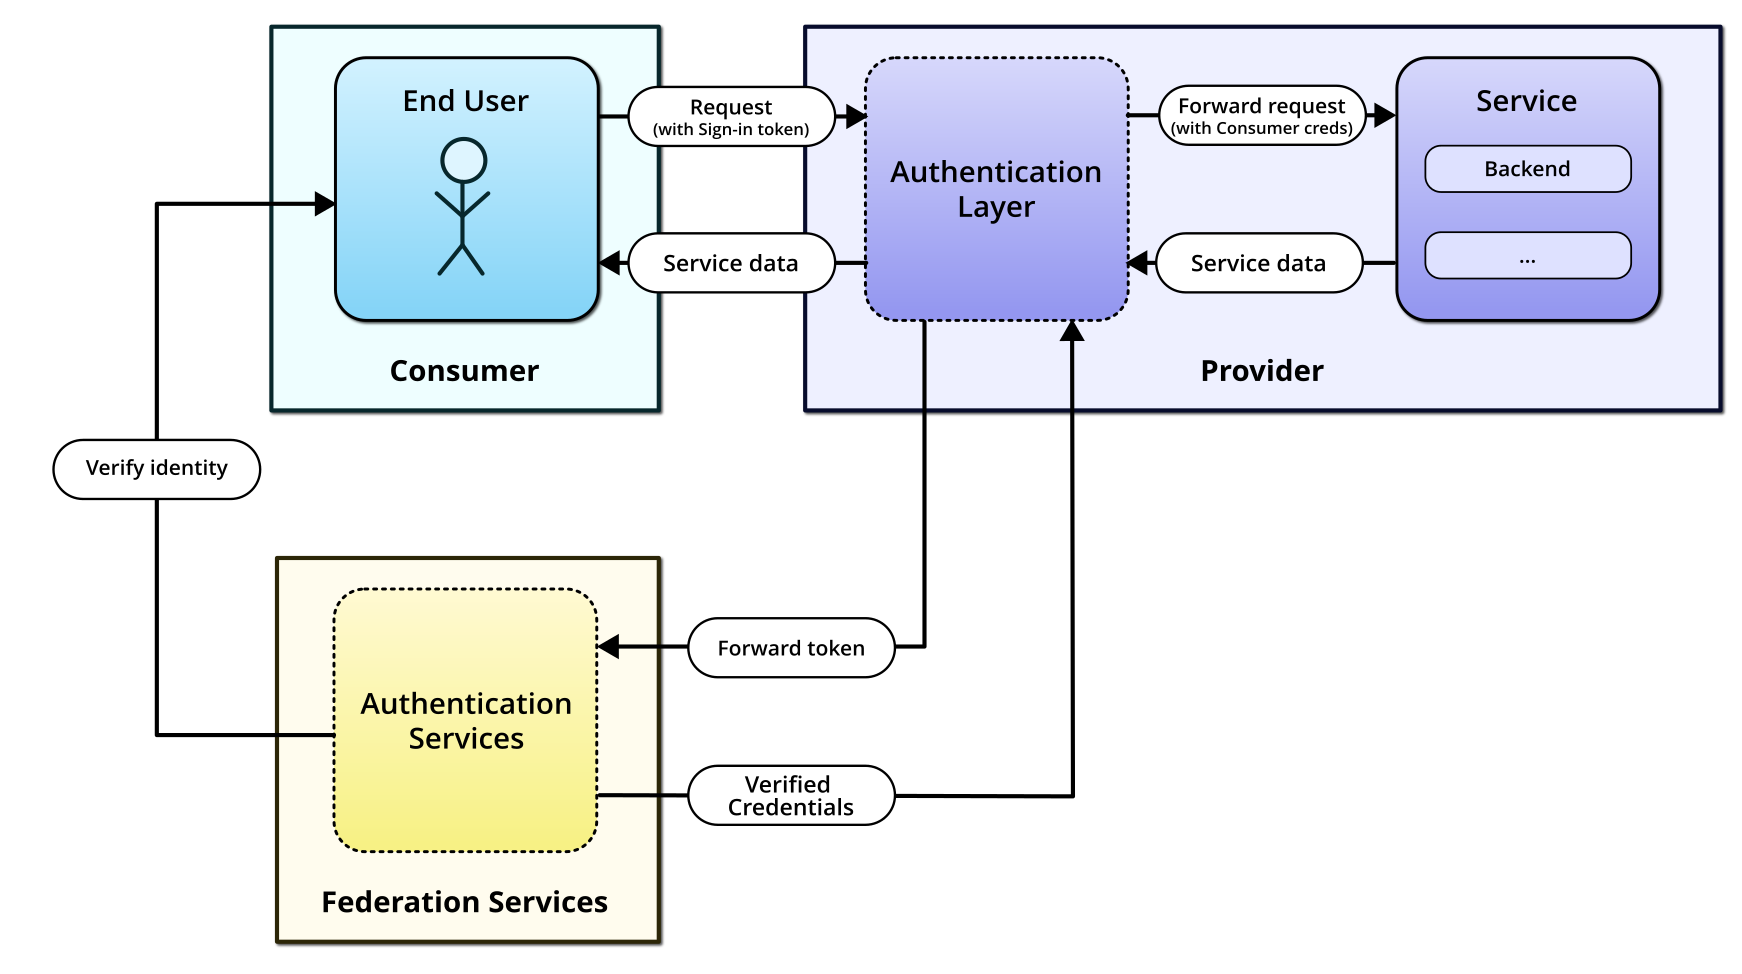
The following figure gives a brief high-level overview of how authentication for a Service works in the GAIA-X-Med ecosystem.

GAIA-X-Med authentication high level overview
First, note that a Service is never directly exposed to the outside world. All requests reaching the Service must first pass through an Authentication Layer, which is implemented on the Provider side and, as its name implies, authenticates incoming requests from Consumers before passing them to the underlying Service (or, in case of authentication failures, denying them).
It does so by receiving an sign-in token from the Consumer, which it forwards to the federation-wide Authentication Services. These are used by all Provider Services in the ecosystem and perform the actual authentication flow, which is described in more detail below.
This architecture ensures that only authenticated requests reach the actual Service, while also leaving most of the heavy lifting to the central Federation Services.
Login token
To identify themselves, a Participant has to supply a Login token. This is a basic JSON Web Token (or JWT) which contains the Participant’s DID URL (in both Subject and Issuer fields) and is signed by their private key.
The DID URL links to the Participant’s credentials and is described in further detail in Becoming a Participant.
The JWT needs to be signed by the private key that corresponds to the public key found in the participant’s DID document. This way, the Authentication Service can be sure that the JWT and the linked credentials are issued by the same identity.
Security considerations
The Login token is created based on the user’s private key and can be used for authentication. Therefore, if either one of your tokens or your private key gets leaked, they can be used to impersonate you.
With the release of Milestone 2, the Participant’s private key is only provided within an encrypted container (the Participant Identity File), so it is hard to accidentally get leaked.
As for the Login tokens themselves, make sure to always configure the expiration time to be as short as possible when generating them. This way, even if one accidentally gets leaked somehow, chances of impersonation attacks get reduced due to the token expiring before anyone can abuse it.
Authentication Services

GAIA-X-Med authentication flow
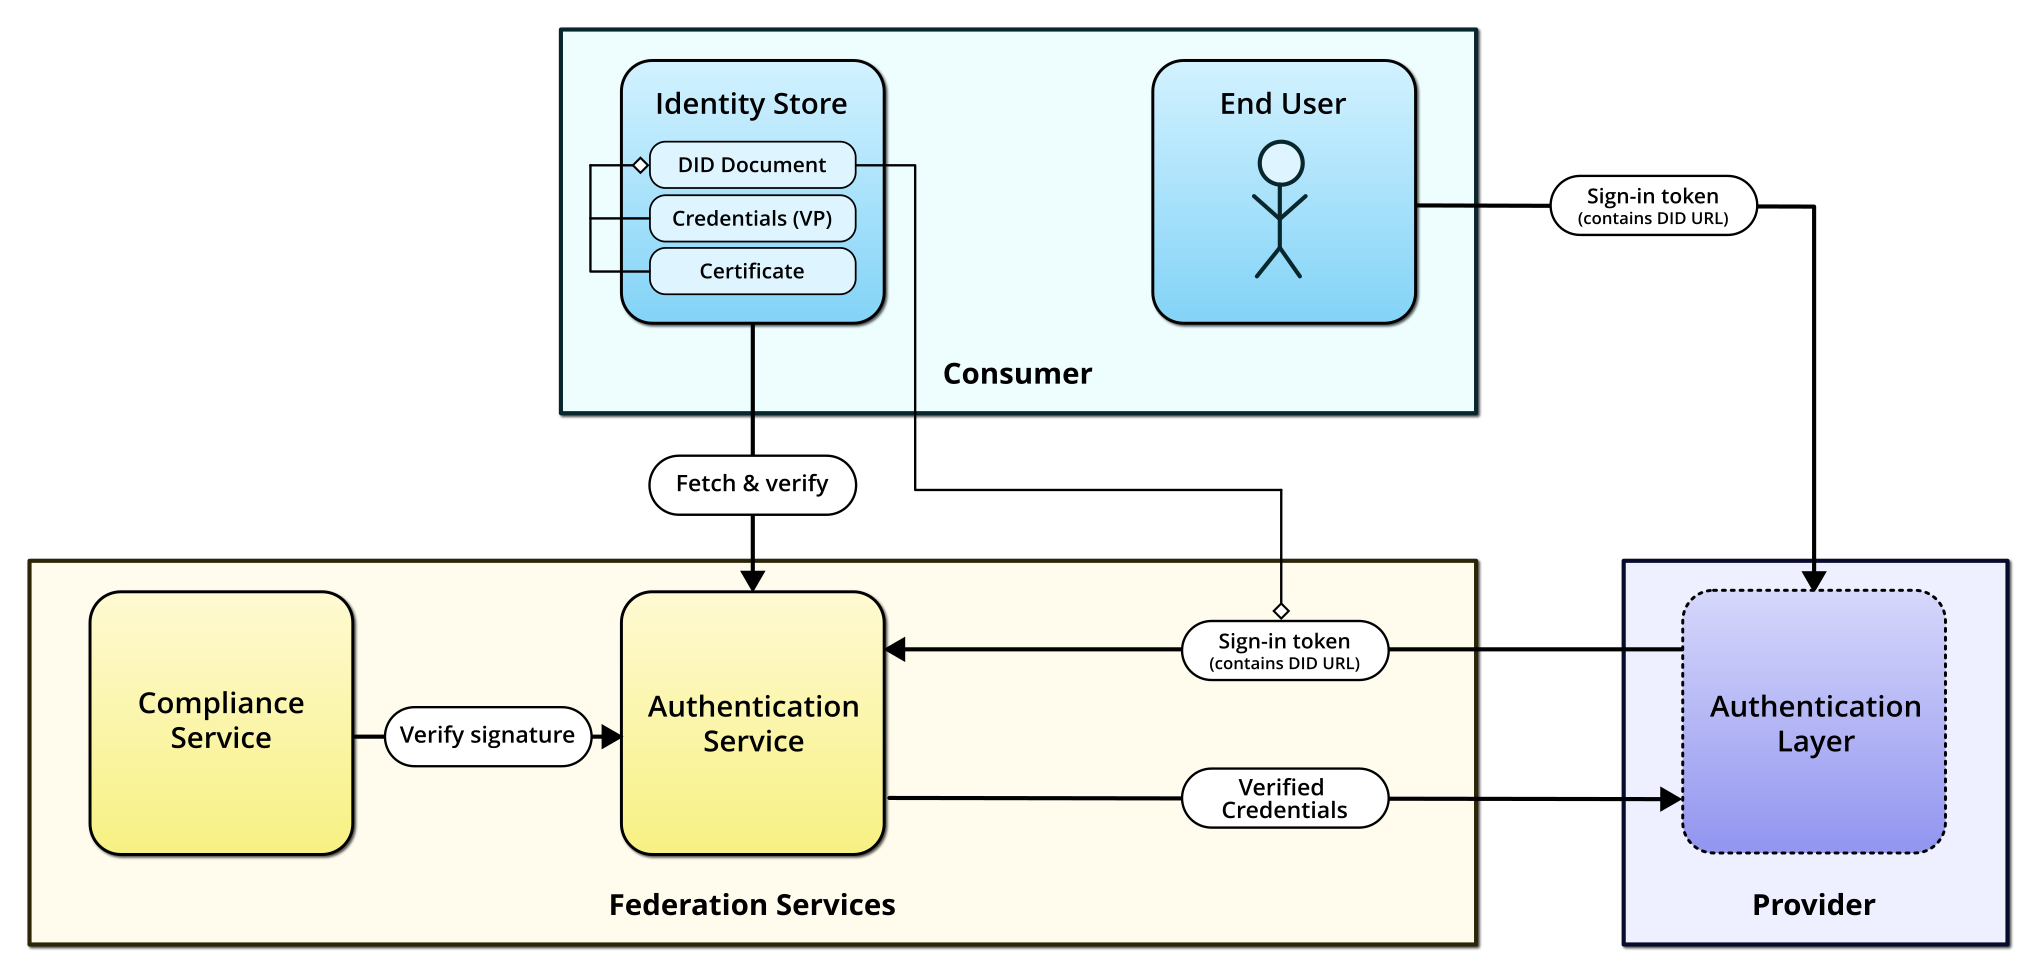
Upon receiving a Participant’s sign-in token, the Authentication Service performs the following steps:
Resolve the DID URL to the location of the Participant’s DID document and fetch it,
Compare the signature of the sign-in token with the public key contained in the DID document,
Fetch the Verifiable Presentation linked in the DID document,
Verify the authenticity of the Participant’s Verifiable Credential (the Participant claims) by checking its signature against the Participant’s public key,
Verify the authenticity of the Compliance Credential issued by the Compliance Service by fetching its DID document and verifying the signature against the public key, and finally
Verify that the Compliance Credential matches the Verifiable Credential by performing a hash comparison.
If everything checks out, the Participant’s credentials are considered to by valid and trusted (as they have been recognized by the Compliance Service, according to the Compliance Credential). The identity of the Participant as well as the contents of the credentials are then returned to the Authentication Layer of the Provider, which can then forward them to the Service as necessary.
Authentication Layer
GAIA-X-Med supports two different methods of implementing the Authentication Layer. One offers authentication through the OpenID Connect standard, while the other is achieved by deploying a simple proxy that transparently handles authentication.
Note
Further implementation details of each method are described in Hosting your own Service.
OpenID Connect method

OpenID Connect based authentication
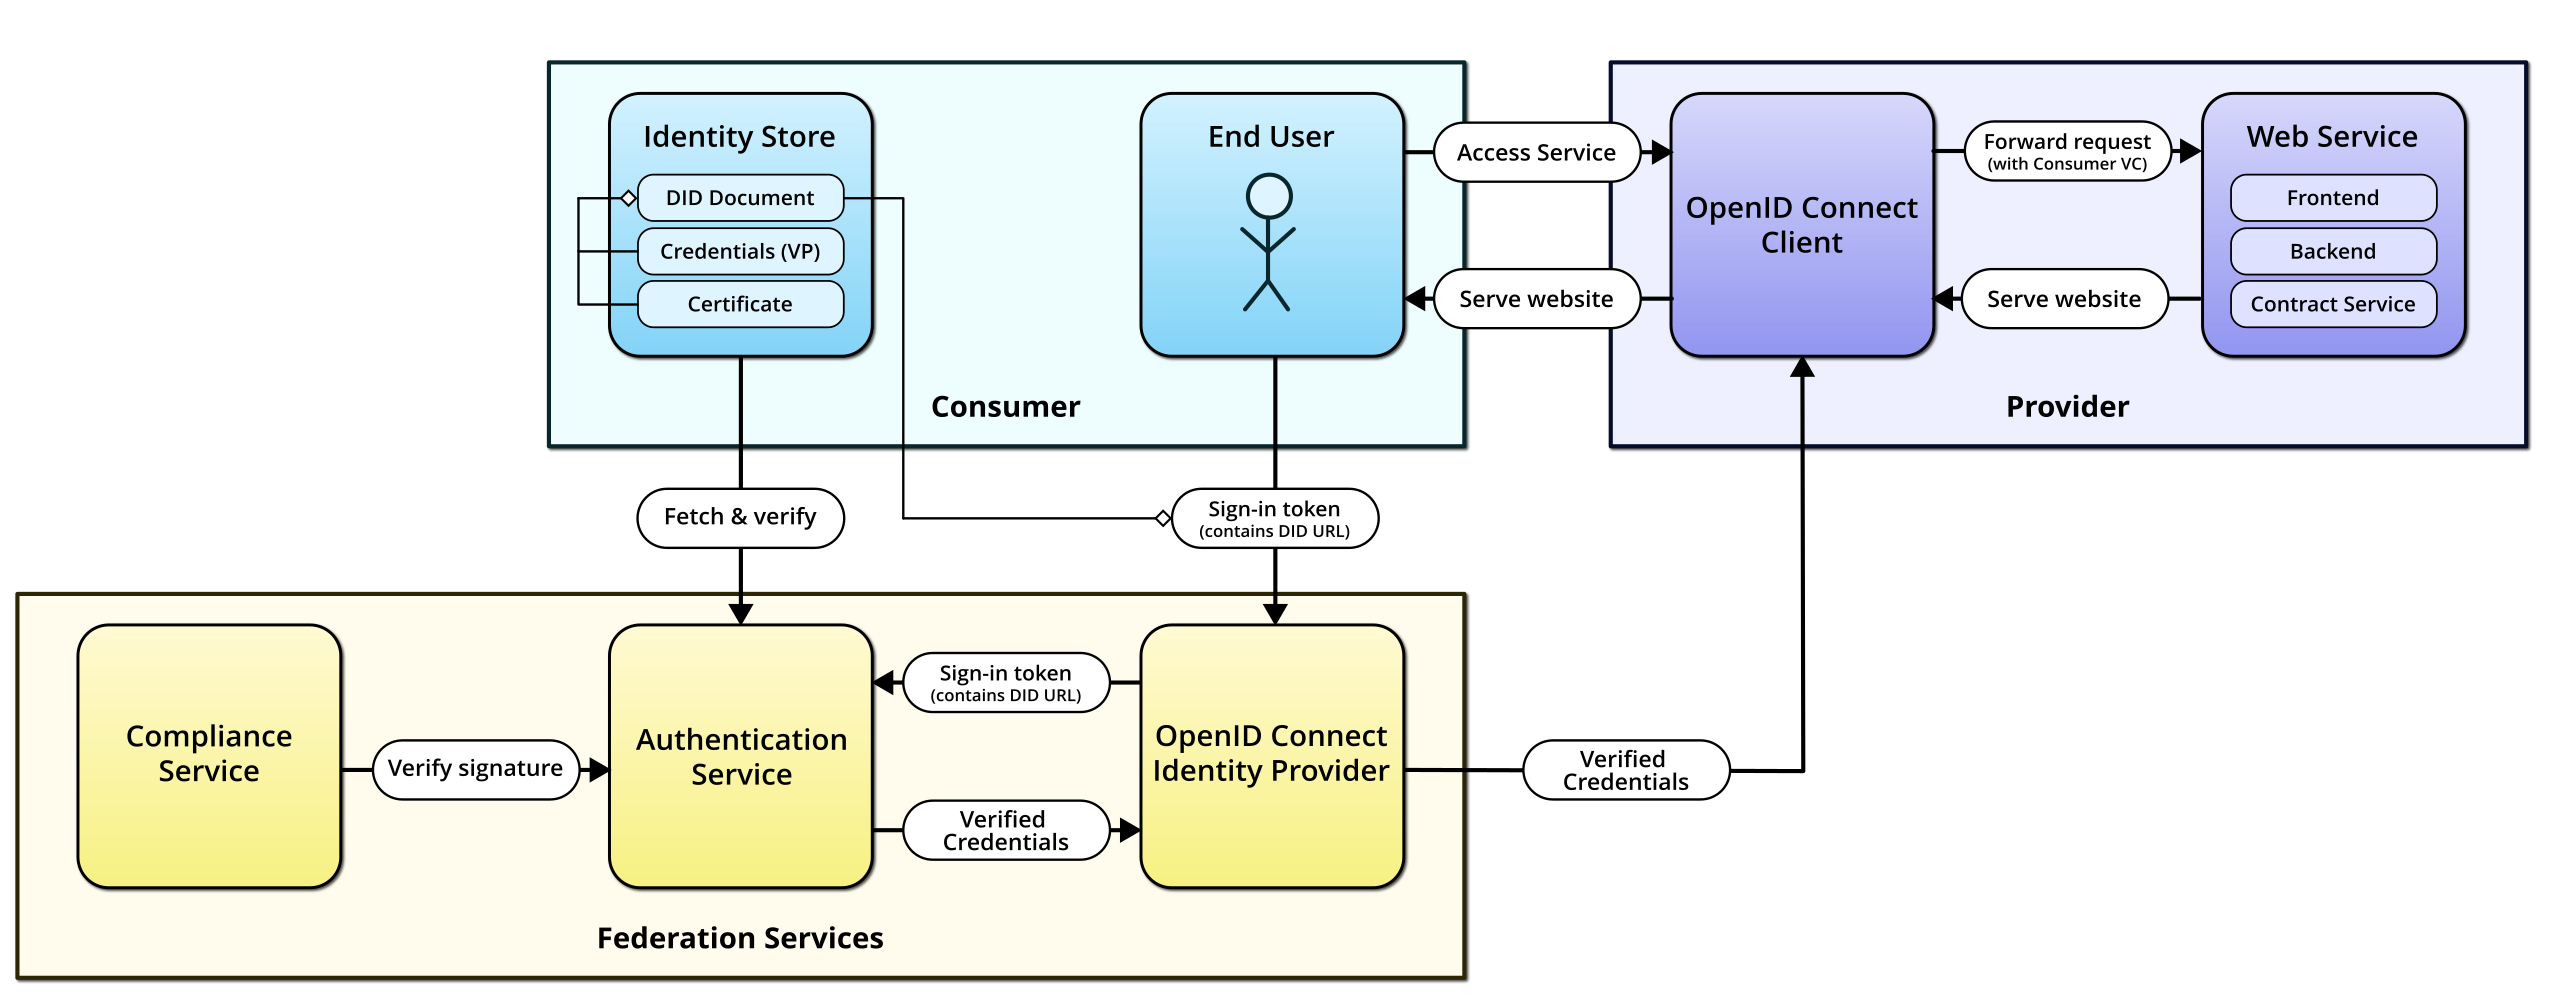
This method offers GAIA-X-Med authentication that is mostly compatible with the OpenID Connect standard. This means that Providers can use OpenID Connect capable clients to handle authentication for their Services.
To accomplish this, the Federation Services encompass an additional service, the OpenID Connect Identity Provider. It implements the necessary protocols and maps GAIA-X-Med credentials to OAuth2 claims.
OpenID Connect based authentication sequence
To implement this method, a Provider needs to install an OpenID Connect client. Consumers are directed to the protected page, where they will be redirected to the federation’s OpenID Connect Identity Provider for authentication. After providing their token, the Identity Provider handles the rest and redirects them back to the application after successful authentication.
Proxy method

Authentication Proxy based authentication
The proxy method makes use of a software component called Authentication Proxy, which is a simple reverse proxy that can be deployed in front of a Service and performs the authentication protocols.
Authentication Proxy based authentication sequence
Implementing this method means running an instance of the Authentication Proxy, and putting it in front of your Service. Consumers can then either use libraries or raw HTTP calls, containing the sign-in token as a request header and pointed at the address of the Authentication Proxy.
Participant Identity File
As described above, a Consumer has to supply a Login Token (JWT) in order to authenticate for a Service.
Instead of requiring users to manually craft and sign such a JWT, we devised a way of accomplishing this automatically. This involves something called a Participant Identity File. This is a file unique to each Participant that contains everything needed to create this token, namely:
the location of the Participant’s DID document, and
the Participant’s private key corresponding to this DID document, used to sign the JWT.
The Participant Identity File is generated automatically when using the Credential Manager, a tool designed to guide Participants through the onboarding process. It is described in more detail in the Participant Onboarding Guide.
Regardless of the authentication method used, the Participant Identity File can be used to generate the necessary token:
For OpenID Connect auth, the OIDC Identity Provider website offers functionality to provide the token and use it to generate the Login Token.
For proxy auth, it is suggested to use a connector library which generates the token from the file, as described in Manual JWT generation and request example.
In either case, the PIF will always be locally decrypted and processed on the user’s computer. Only the Login Token (JWT) will be transferred.
Encryption
As of Milestone 2, the Participant Identity File is encrypted, giving another layer of security to prevent abuse of authorization credentials.
We offer Python and TypeScript libraries that are able to handle decryption and encryption of PIFs. These are used in the Client libraries as well as in the other components that also handle PIFs (like the Credential Manager and OIDC Identity Provider frontend).
Technical details
In case you wish to implement your own solution for handling PIFs, here are the technical details:
The JSON PIF payload is encrypted using an AES-GCM cipher, using an encryption key derived from a passphrase using PBKDF2HMAC (length 32, 100000 iterations), based on a randomly generated salt (16 bytes) and IV (12 bytes).
The PIF data structure is as follows:
Offset |
Length |
Data |
|---|---|---|
0 |
16 bytes |
Encryption salt |
16 |
12 bytes |
Initialization vector |
28 |
n bytes |
Encrypted payload |
28+n |
16 bytes |
AES-GCM authentication tag |