Service Onboarding Guide
Just like a Participant needs a valid identity to be a part of the GAIA-X-Med ecosystem, a Service Offering needs one as well.
If you’ve already followed the Participant Onboarding Guide, this will feel very familiar, as the process is nearly the same: You will make claims about the Service you wish to offer and give it a DID. The Credential Manager will handle the rest, including obtaining compliance and uploading the files to your Credential Store.
Note
This will only give your Service Offering an identity – publishing it in the Catalog is a separate process that can be done afterwards. (Publishing of Service Offerings is subject of Milestone 3.)
Setup & host the Credential Store
If you have not done this already for your Participant identity, you will need to setup an instance of the Credential Store to host the relevant identity files for your Service, just like it does for your Participant.
Please follow the instructions in the Credential Store repository to get an instance running on your own infrastructure. The process involves generating an access keypair, which you will need in the next step when you use the Credential Manager to create your Participant credentials.
Important
The Credential Store is required to be accessible via HTTPS for security reasons (and because it is mandated by the did:web standard). Unencrypted plain HTTP is not supported. If you need a free (as in, gratis) SSL certificate, consider if you can use Let’s Encrypt for your domain.
Perform Service Onboarding using the Credential Manager
The Credential Manager is a web app that guides you through the steps of creating your Service Offering credentials.
Unlike a Participant, you will not receive a Participant Identity File at the end of the process, because that is only needed for authentication, which a Service doesn’t need.
Visit the Credential Manager at https://identity.gaia-med.org/manager/ and select “Service Offering”.

Credential Manager selection menu.
1. Fill out your Service Offering details

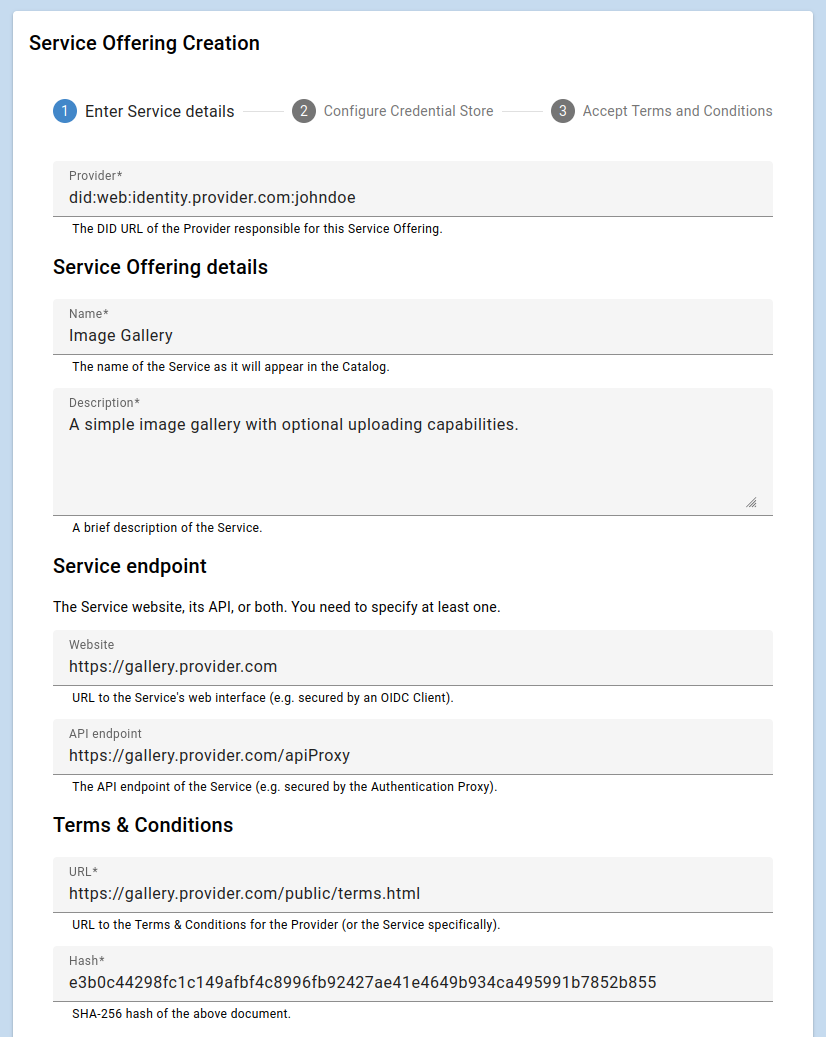
First step of Service Onboarding; filling out Service Offering details.
First, you need to describe your Service Offering. Here is a brief explanation of what you need to specify:
Provider: You need to specify the identity (aka DID URL) of the Provider running the Service, i.e. you. The Catalog will only register your Service Offering later if this matches your identity, so make sure you get it right.
Service Offering details: A short but descriptive name of your Service, as it will later appear in the Catalog, as well as a brief description.
Service endpoint: You need to specify either the URL where the Consumer can reach your Service’s web frontend, or where they can consume its API, or both.
Terms & Conditions: You need to provide a (publicly available) Terms & Conditions document for your Service, as well as the SHA-256 hash of it (to ensure that you did not change its contents after you publish the Service Offering). It is up to you to decide the media type, but we strongly recommend a static HTML or text file to ensure that the hash does not change.
Data export: This describes how a Consumer can request their account data according to GDPR, and in what format they will receive it upon request.
Contract Template: Here you can configure the Contract that a Consumer will need to sign before they can use your Service. This also contains a Consumer Filter which allows you to filter potiential Consumers based on their attributes. See the Contract Negotiation article for more details.
2. Configure your Credential Store

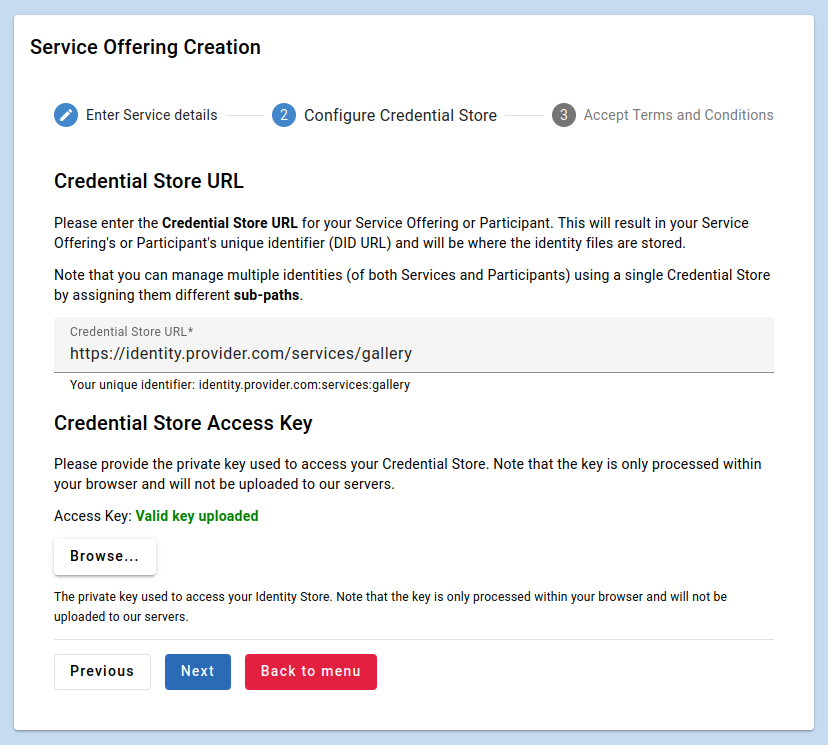
Second step of Service onboarding; configuring the Credential Store.
Provide the URL of where you want your Service identity documents to be stored. This needs to point to an endpoint where an Credential Store instance is running. Note that sub-paths are supported, allowing you to manage multiple identities using a single Credential Store. The full URL will determine your unique Service Offering Identifier as displayed, so make sure you get it right.
Next, browse for the private key belonging to the keypair you used to setup the Credential Store. This is used for authentication purposes.
Note
The private key will only be used client-side in your browser and not leave your computer.
3. Accept the GAIA-X-Med Terms and Conditions

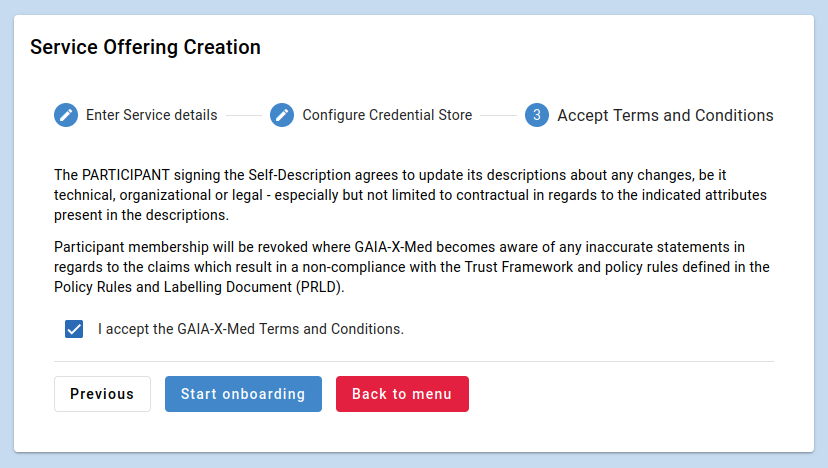
Accepting the terms and conditions.
Confirm the Terms and Conditions by checking the box.
Note
The GAIA-X-Med Terms and Conditions are not finalized and subject to change.
4. Perform the onboarding process

Onboarding in progress.
After clicking on Start Onboarding, the Credential Manager will attempt to perform the necessary onboarding steps by communicating with the corresponding services as well as uploading the required files to your Credential Store. The process can take a few seconds.
Warning
The Credential Manager will perform a few basic sanity checks on your input. Among these, it will attempt to check if the Contract Service you specified in step 1 is publicly reachable. This is mandatory for your Service to be consumable. The Credential Manager will notify you with a warning if it was unable to reach your Contract Service instance:

The Credential Manager could not reach the specified Contract Service, so it notifies the user.
If this happens, re-check your infrastructure setup and proxy configuration. The Demonstrator Local installation guide can give some helpful hints. In particular, you should ensure that your CORS settings allow for requests from any domain, or at least from the Identity Manager and the Catalog domains.
5. Onboarding complete

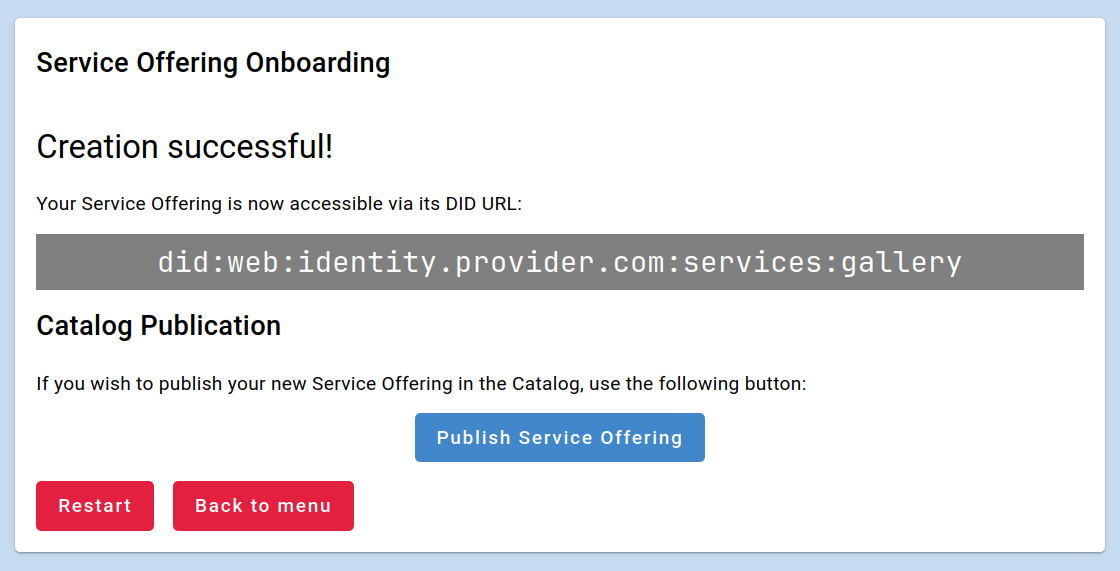
Onboarding complete.
If the onboarding procedure was successful, congratulations! Your Service now has a valid GAIA-X-Med identity.
If you’d like to publish your new service in the GAIA-X-Med Catalog, you can now click the Publish Service Offering button which sends you directly to the Catalog. This is further explained in the Publishing a Service in the Catalog guide.